
You can have an extra amount of fun with this if you are able to use a gym or big room without chairs and stuff in it. With the gym you can have your students act out large portions of Jacob 5. You will need some of the follow (modify depending on how many students you have):
· A loud reader
· 6 students to be trees (1 Original, 1, Gentile tree, 4 scattered trees)
· 12 Small branches (they can easily hold one on a hand)
· Servants to prune, graft, gather, etc.
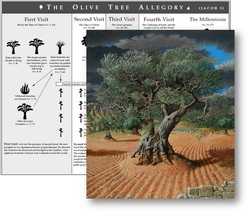
Then you will have the one read the verses and the students act out the parts. I think it will be easiest if you have the CHART printed out in front of you so you can have the reader read the right verses, and you see the whole picture. Click on the graphic for that chart. Before class, act it out several times in your head with the chart in hand so that you don’t get confused. When fruit is good, have them hold the branches pointing up, and when the fruit is bad, have the branches pointing down. You can also label areas where you want trees (students) to stand like:
· Land of Israel
· Land of the Gentiles
· Poor Ground
· Poorest Ground
· Good Ground
The chart will really help with all of this.
Here is also a glue-in to help. CLICK HERE Notice this is a double sided glue-in so you can print and then have your ward copy machine make it double sided. Great information on both sides. Make sure at one point you have them cover the right side and guess what each of the elements represent; or do this on the board before hand. It is a good review activity the second day. Don’t forget to use the video also. Make sure they come away with the big principles mentioned in the manual.
· A loud reader
· 6 students to be trees (1 Original, 1, Gentile tree, 4 scattered trees)
· 12 Small branches (they can easily hold one on a hand)
· Servants to prune, graft, gather, etc.
Then you will have the one read the verses and the students act out the parts. I think it will be easiest if you have the CHART printed out in front of you so you can have the reader read the right verses, and you see the whole picture. Click on the graphic for that chart. Before class, act it out several times in your head with the chart in hand so that you don’t get confused. When fruit is good, have them hold the branches pointing up, and when the fruit is bad, have the branches pointing down. You can also label areas where you want trees (students) to stand like:
· Land of Israel
· Land of the Gentiles
· Poor Ground
· Poorest Ground
· Good Ground
The chart will really help with all of this.
Here is also a glue-in to help. CLICK HERE Notice this is a double sided glue-in so you can print and then have your ward copy machine make it double sided. Great information on both sides. Make sure at one point you have them cover the right side and guess what each of the elements represent; or do this on the board before hand. It is a good review activity the second day. Don’t forget to use the video also. Make sure they come away with the big principles mentioned in the manual.


 RSS Feed
