
New Testament Teaching Ideas
New Testament Bookcase
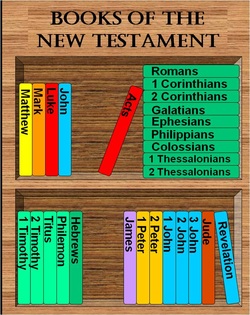
Click on the file below to download the graphic of the New Testament Bookcase. These graphics can be used to make a poster. This poster can be use to help your class learn the books of the New Testament in order. It can also be used to show how the New Testament books are grouped. Later in the year, it can be used to see where they are in their progress in studying. This has always been a nice decoration for the wall. First I will explain how to make the PDF into a poster, and then how I use it in the classroom.
To make the PDF into a poster, take the Black & White one (in digital form or printed out) to a copy store and for a few dollars, they can blow-up the Black and White copy to poster size. Next I would color this according to the colors used on the second page of the PDF. I like to use colored pencils instead of markers. The colors are VERY important because they show who wrote what. For instance, all the books that are blue were written by JOHN. The books in red were written by LUKE. All the green were written by PAUL (the different shades of green are to note personal epistles, verses general epistles). Last I glue this onto colored poster board. You can have the copy store print the color PDF to poster size, but this is VERY expensive.
During the first week of seminary, I like to give an overview of the New Testament. I start this by singing the books in order (see the Primary Songbook). Then I ask:
Why are the books in the order they are in?
A. Chronological order
B. Alphabetical order
C. By Author
D. By Size
E. By Top
After they vote, I show that (partially) all of the above are true except “Alphabetical Order”. This is a good time to explain about the 4 Gospels, Acts, Pauline epistles, and the general epistles. This is also a good time to explain who wrote what (according to the colors on the poster). It may also be a good time to look in the Bible Dictionary (Gospels) about how each of the Gospel writers wrote differently and often shared the same stories.
| new_testament_gospel_glue_ins.pptx |
| nt_bookcase.pptx |
Four Gospels Glue-in
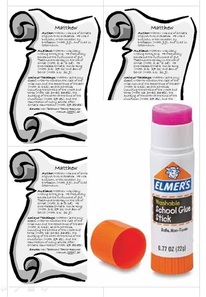
Each of the four Gospels is unique and highlights the Savior’s life in different ways. Whether you are teaching the Gospel’s sequentially, or as a harmony, you will want to help your students see how each writer was different. I would use these glue-ins when doing an overview of the New Testament at the beginning of the year. Thanks Chris Porter for sharing this with me.
I know what some of you are wondering… “What’s a glue-in?” A glue-in is a small handout that can be glued directly into the binding of their scriptures. Let me explain how you do this. Get a glue-stick and have it sticking out about an 8th of an inch. Then with the small glue-in paper, get the edge you would want to be sticking into their binding and give that glue-stick a “paper cut” with the paper. That will give a very small amount of glue on the edge of the paper. Then turn in the scriptures to where you want the glue-in to be. In this case, the first one would go in the first page of Matthew. Then simply slick that paper into the binding and shut the scriptures (so you will want to do this at the end of class). Then the next time your students open their scriptures to Matthew 1, the glue-in will be sticking out with lots of useful information for them.
I know what some of you are wondering… “What’s a glue-in?” A glue-in is a small handout that can be glued directly into the binding of their scriptures. Let me explain how you do this. Get a glue-stick and have it sticking out about an 8th of an inch. Then with the small glue-in paper, get the edge you would want to be sticking into their binding and give that glue-stick a “paper cut” with the paper. That will give a very small amount of glue on the edge of the paper. Then turn in the scriptures to where you want the glue-in to be. In this case, the first one would go in the first page of Matthew. Then simply slick that paper into the binding and shut the scriptures (so you will want to do this at the end of class). Then the next time your students open their scriptures to Matthew 1, the glue-in will be sticking out with lots of useful information for them.
| new_testament_gospel_glue_ins.pptx |
Storyline of the Gospels
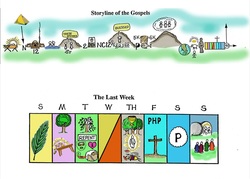
I wanted to send this next post out now because I will be too busy next week to get it done. Many of you asked if there was a story timeline for the New Testament like I shared for the Old Testament. Well here it is (click on the image). Thank you Marilu Coster for cleaning up the graphics, coloring… and sharing this with me. As I understand it, Richard Deland created it originally.
Notice it is in color and black & white. It is a good timeline to help the class see where they are in the storyline of Jesus’ life at any particular point. It could also be a good to help with a review or overview as you have them identify the different events in the Savior’s life. The third page is the key to help you know what some of the symbols represent. The last pages are bookmarks or smaller handouts for the class.
Notice it is in color and black & white. It is a good timeline to help the class see where they are in the storyline of Jesus’ life at any particular point. It could also be a good to help with a review or overview as you have them identify the different events in the Savior’s life. The third page is the key to help you know what some of the symbols represent. The last pages are bookmarks or smaller handouts for the class.
| storyline_of_the_gospels.pptx |
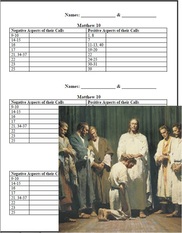
Matthew 10 Worksheet
| matthew_10_worksheet.docx |
Matt. 13, Luke 15, & Matt. 25 -Parables of Jesus:
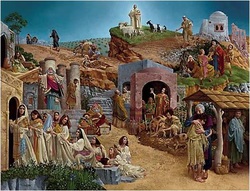
This weekend we had a Multi-Stake Seminary & Institute Training where I shared a lesson on teaching the Parables of Jesus. It was really only parts of Matthew 13, Matthew 25, and all of Luke 15. Obviously, these worksheets and helps (Click on the image), are going to be a little ahead for most. You might want to print them off, and then stick them into the Teacher Resource Guide where they would go. Or perhaps you have a better way to keep organized.
Remember that you want to help them discover the answers that would go on the worksheets, through asking well crafted questions. In my opinion, that is the essence of the art of good teaching.
Remember that you want to help them discover the answers that would go on the worksheets, through asking well crafted questions. In my opinion, that is the essence of the art of good teaching.
| parables_of_jesus.doc |
Pharisees, Sadducees, Zealots -Oh my!"
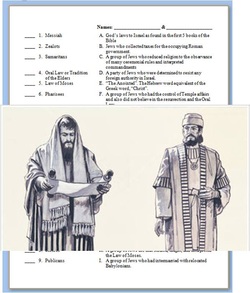
I know you teachers are all spread throughout the Gospels. But this is a simple worksheet to help you class learn, or review, some of the main groups and terms used in the New Testament. I like to have them do it in pairs and a treat for the pair who does it first correctly. Then go over it as a class and discuss.
| matching_of_groups_and_terms.doc |
Matthew 23: "Who Am I?" Worksheet
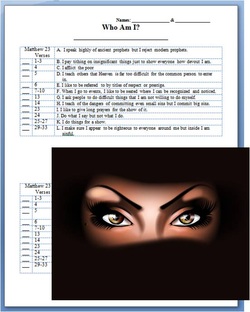
I hope this worksheet does a few things for your teaching when you come to Matthew 23. It can help give you a hook with the students to start the lesson. Start class by simply saying “Who am I?” and then read the clues on the right. By the time you get to the end of the list, they should have figured out is it a “Hypocrite”. Then pass out the papers and have them get with a partner to match the verses with the statement. After they have had about 5 minutes, go over it as a group. Ask questions like, “Does that happen today? How? What is this saying we should be doing as individuals?”
| matthew_23_worksheet.docx |
Matthew 24 & Book of Revelation -Second Coming Handout:
The Word document here is a great handout for your students concerning the Second Coming of our Lord. They are made so you can make a two sided copy and then split it in half for your students. On the one side is a chart that Larry Dahl made showing the 7 thousand year periods (Seals in the Book of Revelation) spoken of in scripture and where earth’s events fit in. It also shows how the JST of Matthew 24 helps to clarify which events happened in the New Testament times, and which are just before the Lord’s return.
The other side has my favorite Joseph Smith quote about the Second Coming and shows that there are some very specific events that must happen before He returns (Sadly His return can’t be tomorrow). Next to that is what I think are the most important chapters to study in regards to the Lord’s return. If you have already taught Matthew 24, you can use it later when you teach the Book of Revelation.
Also, I apologize that often these resources are not coming to you in a timely manner. The reason is that some teachers are teaching harmony, some sequential; some started the second week in August, while others started in September. But hopefully, the timing isn’t too far off. Also it may be useful to use in a different place in scripture. Just print it off and slip it in Teacher Resource Manual where you will use it later.
| second_coming_quote___scriptures.docx |
Luke 10 & 15 Lesson Helps
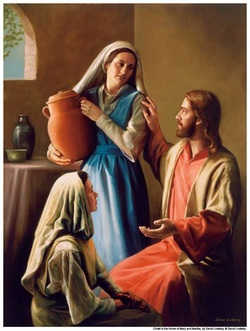
Here are some lesson ideas for Luke 10-15. There are all combined on a single document that downloads when you click on the file below. The first is a handout and poem that goes with Luke 10:38-42 about when Jesus visits the house of Mary and Martha. Make sure you also teach the principle about our priorities in life and choosing between “Good, Better, and Best”.
Next on the document are helps for teaching Luke 15 and the parables of the Lost Sheep, Lost Coin, and Lost Son. There is a fun adaptation of the Prodigal Son, and also a worksheet with Luke 15.
Next on the document are helps for teaching Luke 15 and the parables of the Lost Sheep, Lost Coin, and Lost Son. There is a fun adaptation of the Prodigal Son, and also a worksheet with Luke 15.
| luke_15_worksheet.docx |
John 8 Worksheet & Margin Markers

Two things this week. First is something I tried to live by when I taught seminary. It is that every page that you take significant time in class to study, deserves a Margin Marker. That is simply some annotation in the margin that says what the lesson is in the verses. Usually just a few words can do the trick. As I have looked over the scriptures I have used, I have found that the little notes mean most to me. So there’s a challenge to you to have your students write something significant in the margin of each page they study.
The page is a simple worksheet to help you teach John 8. It also uses “Margin Markers” so you might need to explain that first to your class.
The page is a simple worksheet to help you teach John 8. It also uses “Margin Markers” so you might need to explain that first to your class.
| john_8_worksheet.doc |
Acts 1-4 Worksheet
Many Christians look to the Book of Acts as a pattern to try to figure out what Christ's church should look like on the earth today. Click on the file below to download the worksheet. With this worksheet, break your class into pairs and have them look for elements of Christ’s true church. After they share what they found, ask questions like, “Is that true in the church today? Is it true in many other churches today?” Testify that our church is Christ’s church restored to the earth. Also share the great quote from President Lee about apostles today.
| acts_1-4_worksheet.docx |
Acts 9 -The Apostle Paul Glue-in
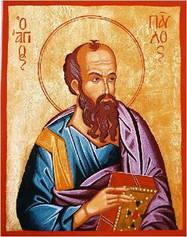
For the rest of the year, from Acts 9 on, you will be learning a lot about the life and writing of the Apostle Paul. He wrote more than half of the books of the New Testament (14) and he will be the main guy for about 10 weeks in the curriculum.
Here is that glue-in that briefly describes Paul, and outlines who he was.
Here is that glue-in that briefly describes Paul, and outlines who he was.
| acts_9_paul_glue_in.doc |
Annotating Paul's Letters
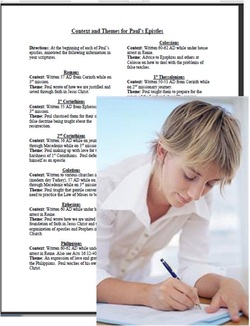
A few of you were wondering if I had any glue-ins for Paul’s letters. Here is something that might be better. In seminary we want to get the students in the habit of writing notes and annotations in their own scriptures. So here is an assignment that gets them to do that. Print out a handout for each pair of students and have them write the brief annotation at the top of the beginning of each epistle of Paul in their scriptures. It might be easiest to do this all at once for Paul's 14 books.
| annotations_for_pauls_epistles_headings.docx |
1 Corinthians 15:40-42 Three Degrees of Glory Worksheet.
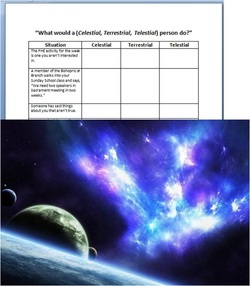
Click below to get the worksheet. It helps students think about the kind of person they need to be. I think it is also VERY important to share that those who receive Celestial glory are not perfect people, but made perfect through Christ (D&C 76:69); and that they are valiant and always striving and trying to follow the Lord (D&C 76:79).
The worksheet is one I got from Art Mechem years ago. Thanks Art!
The worksheet is one I got from Art Mechem years ago. Thanks Art!
| 1_cor_15_comparison.docx |
1st Peter 2:9 "Peculiar and Proud of it!"

This handout/glue-in goes with 1st Peter 2:9 on how God has chosen us to be “a peculiar people”. Go over each of the statements that are around the sides of the glue in. Ask the class how we as a people are doing with each of those, and how that makes us peculiar to the world. This may seem similar to an idea I shared last year with Exodus 19:5.
| exodus_19_peculiar.ppt |
1st John Worksheet
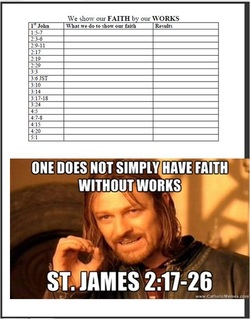
First John does a fantastic job of showing how our works show our faith (building off of what James taught). You might want to have them work in pairs as they do this worksheet. Click on the file below to download the worksheet.
| 1st_john_worksheet.docx |
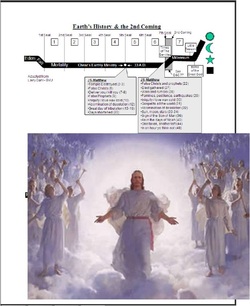
Seals of the Book of Revelation & Handouts

Most of the world doesn’t have a clue about so much in the Book of Revelation. Biggest example of this is when they talk about “The Four Horsemen of the Apocalypse” that come with the first 4 seals being broken. Through revelation to Joseph Smith, he learned that each seal is a thousand year period of time (see D&C 77:6-7). This means that Revelation 5 represents the pre earthlife when Jesus offered Himself to atone for us and open the seals (start earth life). Revelation 6 is a brief history of earth’s history by each seal representing a thousand year period. So the handout here shows the chronology of the earth and each seal. It also shows us we are in the 6th seal. Click on the graphic to see the handout. I shared this earlier with Matthew 24.
| second_coming_quote___scriptures.docx |
